

Irregular pearls attract attention with their singular shapes and natural lustre, yet their uneven girdles and thin nacre layers leave jewellers little room for error. A careful assessment of each pearl's structure and a considered choice of peg, cup or bespoke bezel can be the difference between a secure mount and a marred surface.
This post explains how to identify shape vulnerabilities, match mounting styles to a pearl's bearing points, and select the appropriate peg, cup or bespoke bezel fixings. It also outlines practical surface-protection methods and offers guidance on organising inspections and working with a jeweller to preserve lustre and prevent future repairs.

How to assess a pearl's anatomy and identify shape irregularities
Examine the nacre under magnification to assess thickness and surface continuity, noting any pits, hairline cracks or thin edges. Orient the pearl so its thickest, most uniform section bears contact and carries the load. Map the pearl's anatomy by identifying the girdle, drill hole, keel and any protrusions or concavities, and choose designs that avoid clamping or pressing on raised points. Opt for mounts that support hollows and broad surfaces to reduce point loading, favouring support-first configurations that cradle the circumference or cup the base rather than relying on metal touching the nacre face. Where contact is unavoidable, protect contact points with thin, soft liners such as PTFE, silicone or jeweller's cotton to prevent abrasion and preserve the pearl's natural lustre.
Where possible, secure the pearl mechanically by surrounding it or socketing it rather than bonding directly to the nacre. If an adhesive is unavoidable, test it on a spare bead first and ask a specialist to apply and remove it to avoid chemical or solvent damage. Engage an experienced lapidary or setter for drilling, pegging or bespoke mounts, and request microscopic inspection to confirm the chosen orientation and the security of the fastenings. Finally, ask for a proof fit so you can observe how stress distributes across the pearl and ensure any vulnerable zones receive adequate support.
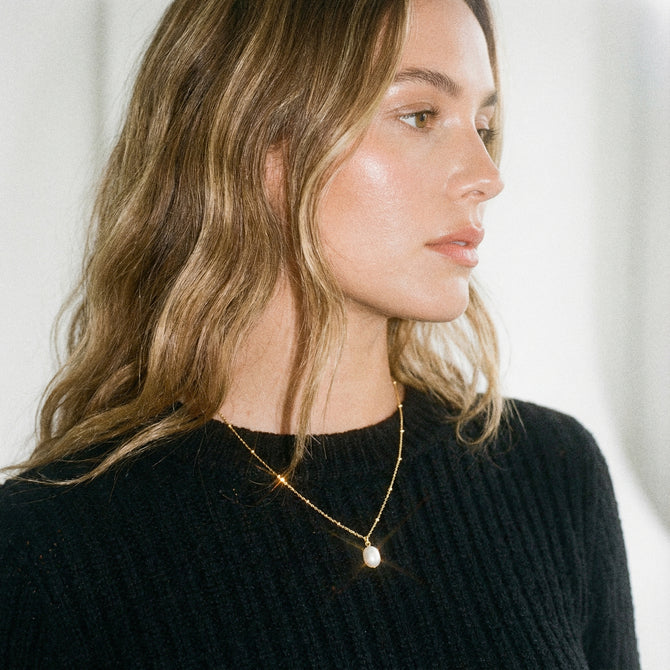
Choose flowing gold hoops that cradle natural pearls.

Choose the right mounting for each pearl shape: peg, cup or bespoke bezel
Begin by documenting each pearl's shape, drill position and nacre condition. Photograph the piece, measure key dimensions with callipers and mark probable contact points so the setting follows the pearl's natural profile rather than forcing it into a standard aperture. For pegged pearls, insert a tapered metal peg into the drill hole and secure the peg to the mounting rather than to the nacre, leaving a microscopic clearance so thermal or mechanical movement can be accommodated. For cup settings, machine or hand form a concave seat that mirrors the pearl's lower surface. Line the seat with an inert cushioning layer, apply adhesive to the metal only, and finish with a low bezel lip that protects the pearl's edge without pinching.
Begin custom bezels for baroque and irregular pearls with a wax impression or a digital scan so the collar can be formed to the pearl’s unique contours and distribute support across a broader surface. Incorporate adjustable tabs or a removable, softly lined collar, and secure orientation with minimal, reversible adhesives recessed to avoid stressing the nacre. Confirm retention by applying gentle axial and lateral pressure with a probe wrapped in soft cloth, inspect seams under magnification for any gaps, and avoid overly tight prongs that create edge stress. For ongoing care, exclude ultrasonic and steam cleaning as these methods can weaken adhesives and harm the nacre, and arrange periodic inspections to detect loosening before it leads to damage.
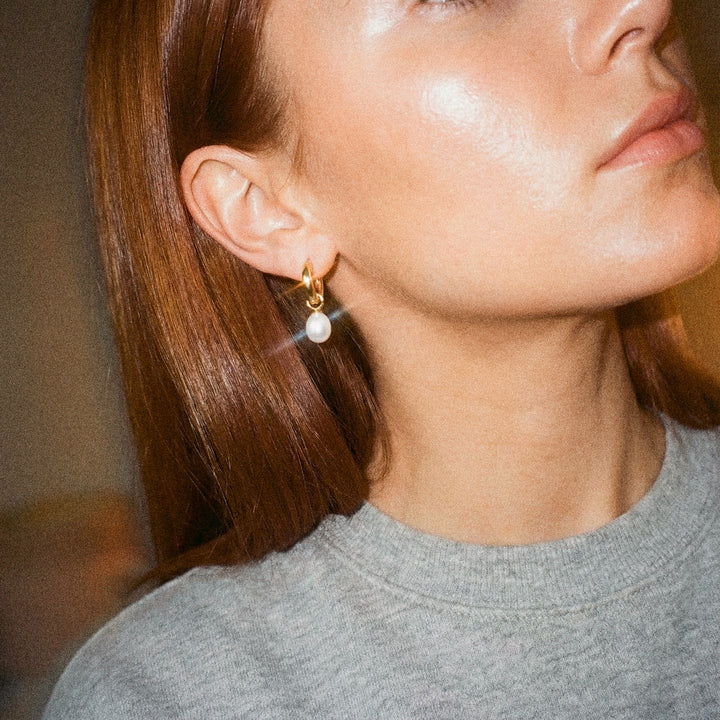
Choose secure low-bezel studs for safer daily wear

How peg, cup and bespoke bezel fixings work
Begin by examining the pearl with a loupe or magnifier to locate the drill hole. Assess the nacre thickness visually and note any asymmetry so the fixing can be seated on the thickest, least stressed area. Pearls with thin nacre or hairline fractures at the drill edge are more prone to cracking under bending or point loads. For peg fixings, match the peg diameter and material to the hole so it sits snugly without being forced. Stop the peg short of the core or the opposite surface, and use a shoulder or shallow seating rim to prevent over-insertion and to reduce tensile stress at the drill hole.
When setting a pearl, shape the cup to mirror the pearl's lower contour so compressive forces are spread across a wider area. Line the cup with a soft, inert pad or a thin metal foil to cushion the nacre, and secure the pearl with a minimal bezel rim or discreet prongs rather than relying solely on adhesive. For highly irregular pearls, design a bespoke metal bezel that cradles the base with customised contact points; prototype the fit in a modelling medium and add a soft liner to protect the nacre, helping to avoid deep drilling or excessive glue. After setting, perform a gentle pull and wiggle test and inspect the drill edge under magnification for any signs of microfissures. Avoid ultrasonic cleaners and strong chemicals, and favour reversible adhesives or mechanical fixes so the pearl can be removed for repair or replacement without further damage.
Choose secure, low-profile studs that cradle pearls gently

Safeguard a pearl's surface when securing its setting
Irregular pearls are best set in shallow bezels, metal cups or custom-shaped seats. These spread contact over a larger area and reduce point stress on the nacre. Low-profile prongs will hold a pearl securely without biting into its surface; for example, a shallow cup supports a pearl's flat face and distributes load, lowering the risk of surface microcracks. Prioritise mechanical support before any adhesive work. Build a tailored metal seat and apply glue to the metal rather than to the pearl, or place a thin protective film between the pearl and adhesive. Choose reversible adhesives or soft waxes because nacre is organic and moisture sensitive; direct contact with permanent adhesive can discolour or penetrate the surface. Handle components with care. Use soft-jawed pliers and pad clamping points with leather, silicone or PTFE tape. Support the pearl on modelling clay or clean putty while tightening fastenings slowly, and practise on spare beads to judge the correct amount of force. These precautions reduce surface abrasion and allow you to assess whether a low-pressure setting provides a secure fit before resorting to more invasive measures.
If drilling or pegging cannot be avoided, support the pearl on a soft yet stable backing. Use a fine, very sharp small-diameter drill bit at low speed with a suitable coolant, and limit drilling to the minimum necessary depth. Fit a short, tapered peg that seats into a matching cavity rather than a long, intrusive post to reduce the risk of cracking. Prototype the seat in modelling clay or with a 3D-printed test ring, then carry out gentle pull and torque tests and examine under magnification for any movement or surface marks. These checks confirm the repair is mechanically secure yet reversible. Record the chosen method and materials so future conservators can understand and, if necessary, reverse the repair.
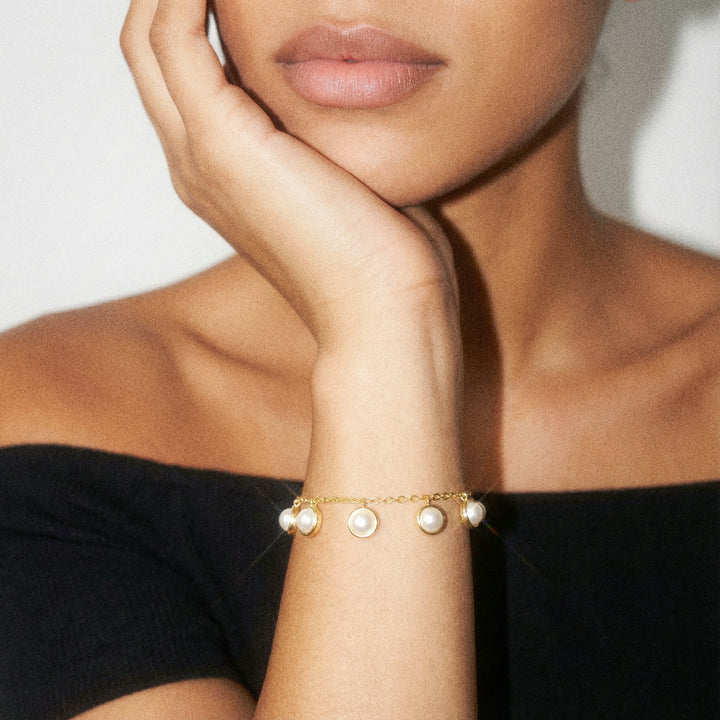
Use low-profile huggies to support irregular pearls safely.

Organise regular inspections with a trusted jeweller for lasting care
Non-invasive settings, such as a customised metal cup or a low-profile bezel lined internally with medical-grade silicone or microfibre, gently cradle an irregular pearl and provide mechanical support that reduces reliance on adhesives. Adhesives can penetrate and discolour the pearl's organic nacre, so preserving mechanical retention where possible is preferable. By contrast, invasive methods like drilling or pegging remove material and introduce stress points, while tightly clenched prongs concentrate pressure and can abrade the surface. Reversible mechanical fixes therefore preserve more of the pearl's structure. In constrained situations a jeweller might use a reversible, conservation-grade adhesive; documenting that choice helps reduce the risk of long-term staining and informs future caretakers.
Create a visual baseline by taking high-resolution photographs from several angles and noting any existing issues under magnification. Check for rotation or sideways movement, new scratches or colour changes, deformation of metal seats and prong tips, adhesive residue, and instability around drill holes. When engaging a jeweller, ask specifically about their experience with pearls and request before-and-after examples of similar repairs. Authorise any invasive work, such as drilling or re-polishing, only with written consent. Ask the jeweller to provide a written record of the materials and methods used so future caretakers understand what has been done. Avoid ultrasonic machines and steam cleaning. Remove pearl jewellery before exposure to chemicals or any mechanically hazardous activity. Store pieces separately in soft pouches and arrange a professional inspection after any knocks or if you notice movement. For re-stringing or re-seating, ensure a specialist uses appropriate thread and knots between pearls to distribute stress evenly.
Irregular pearls should be mounted with a support-first approach and handled with particular care to protect thin nacre and uneven girdles. Examine each pearl under magnification, map the bearing points, and select a peg, cup or bespoke bezel that cradles rather than clamps. Mechanical supports, soft liners, reversible adhesives and trial fittings help to reduce point loading, allow future removal and limit solvent or heat damage to the nacre.
Begin by documenting the pearl's shape and drill position and by preparing prototype seats. Request a microscopic inspection and a proof fit, and avoid ultrasonic or steam cleaning to preserve the pearl's lustre. Engage an experienced setter, keep a clear record of the materials and techniques used, and arrange regular inspections so you can spot any loosening or surface changes before repairs become necessary.